
Instructions for Use

Antimicrobial Mask

A medical procedure mask designed primarily to act as a physical barrier, preventing transmission of pathogens from the wearer to the environment - tested to the ASTM F2100 standard.

ASTM F2100 tested
Single use
Adult size
Protect from light
Download IFU (PDF)
Step-by-step procedure

Wearing your mask correctly

Follow each step in order. Switch tabs to see how to put the mask on and how to safely remove it.

Putting the mask on - 6 steps
Wash your hands
Thoroughly wash and dry your hands.
Remove from packaging
Remove the mask from its packaging. Hold the mask with the outer layer out.

The outer layer is a light-green colour. This side should face away from your face when donned.

Open the pleats
With the pleats folding down, grasp the top of the mask at the centre of the metal nose piece. Pull the bottom edge to open the pleats.
Position on your face
Place the mask against your face with the nose piece centred on the bridge of your nose. Press it to the bridge and along your cheekbones to shape the mask.
Secure the ear loops
Pull the ear loops over your ears.
Confirm the fit
Press the nose piece to your face one more time to ensure a secure fit.
Putting the mask on - 6 steps
A group of people wearing 3d glasses in front of a billboard.
Wash your hands
Thoroughly wash and dry your hands.
A group of people wearing 3d glasses in front of a billboard.
Remove from packaging
Remove the mask from its packaging. Hold the mask with the outer layer out.
A group of people wearing 3d glasses in front of a billboard.
Open the pleats
With the pleats folding down, grasp the top of the mask at the centre of the metal nose piece. Pull the bottom edge to open the pleats.
A group of people wearing 3d glasses in front of a billboard.
Position on your face
Place the mask against your face with the nose piece centred on the bridge of your nose. Press it to the bridge and along your cheekbones to shape the mask.
A group of people wearing 3d glasses in front of a billboard.
Secure the ear loops
Pull the ear loops over your ears.
A group of people wearing 3d glasses in front of a billboard.
Confirm the fit
Press the nose piece to your face one more time to ensure a secure fit.
FIT CHECK

How do I know my mask is on correctly?

Select a marker on the image, or a point below, to learn what to check.

Metal nose piece at the top

The formable metal nose piece sits along the top edge, moulded to the bridge of the nose.

"Waterfall" pleats

The pleats typically fall downwards and away from the nose.

Colour always faces out

The white - or smoothest - side sits against the skin; the light-green colour always faces outward.

Nose and mouth covered

The mask fully covers both the wearer's nose and mouth.

Reference

Product information

>99%
Virus reductionin 10 minutes
Antiviral & antibacterial performance

The mask is designed to inactivate pathogens that contact its outer layer. Against human coronavirus 229E - an accepted substitute for SARS-CoV-2 - a greater than 99% reduction in virus level was measured in 10 minutes per method ISO 18184. It has also been assessed against several bacteria with similar results.

Lorem ipsum dolor sit amet, consectetur adipiscing elit, sed do eiusmod tempor incididunt ut labore et dolore magna aliqua. Ut enim ad minim veniam, quis nostrud exercitation ullamco laboris nisi ut aliquip ex ea commodo consequat. Duis aute irure dolor in reprehenderit in voluptate velit esse cillum dolore eu fugiat nulla pariatur.

Lorem ipsum dolor sit amet, consectetur adipiscing elit, sed do eiusmod tempor incididunt ut labore et dolore magna aliqua. Ut enim ad minim veniam, quis nostrud exercitation ullamco laboris nisi ut aliquip ex ea commodo consequat. Duis aute irure dolor in reprehenderit in voluptate velit esse cillum dolore eu fugiat nulla pariatur.

Lorem ipsum dolor sit amet, consectetur adipiscing elit, sed do eiusmod tempor incididunt ut labore et dolore magna aliqua. Ut enim ad minim veniam, quis nostrud exercitation ullamco laboris nisi ut aliquip ex ea commodo consequat. Duis aute irure dolor in reprehenderit in voluptate velit esse cillum dolore eu fugiat nulla pariatur.

Instructions For Use

Self Adherent Wraps: Proper Use Guide

Self Adherent Wraps: Proper Use Guide

1. Unwind approximately 12 inches of self adherent wrap from the core and let it fall slack.


2. With minimal tension apply one full wrap with the edges overlapping.
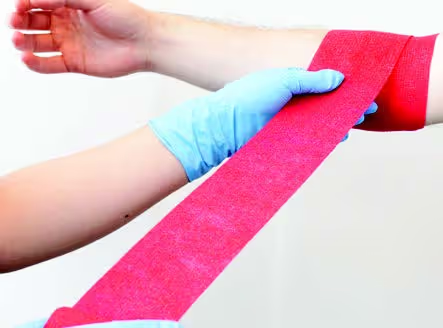


3. Continue Wrapping, always unwinding the self adherent wrap from the core before going around. Use an appropriate amount of tension to achieve the desired compression for your application. Avoid excessive tension as this may cause injury.
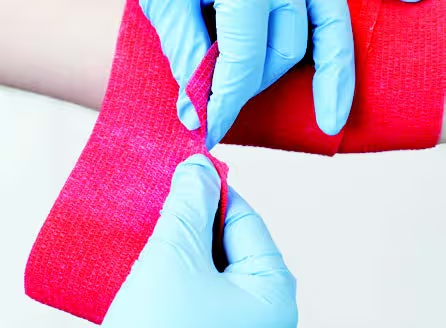
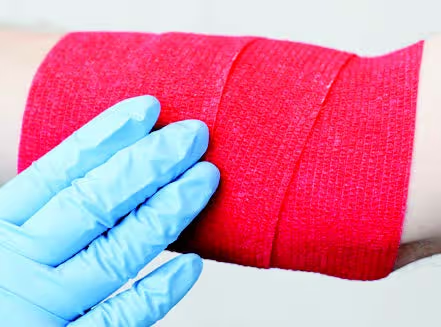

4. Once finished with the application, any excess wrap can be cut off or torn off. Secure the end of the application by carefully pressing the self adherent wrap.

WARNINGS:

  • DO NOT apply the self Adherent wrap too tightly. This can lead to impaired circulation which can result in serious injury. This risk is higher for children.
  • DO NOT place the self adherent wrap directly over an open wound as this could lead to infection.
  • Monitor the area every few hours for changes in sensation, including tingling, numbness, pain, swelling or discolouration. If this happens, remove the wrap immediately and consult your health care provider.

PERCAUTIONS:

  • This product is single use only. Do not reuse.
  • For sterile product, do not use if package is open or damaged.

SHELF  LIFE  &  STORAGE:

  • Store self adherent wraps in a clean, dry space at room temperature.
  • Store self adherent wraps in packaging until ready to use.
  • The shelf life for each sterile self adherent wrap is indicated on the packaging.

Specifications and availability may change without notice, please see your dealer. PRIMED makes no claims, representations, or warranties, either expressed or implied about the suitability of any products listed above for any specific medical purpose. It is contingent among the user to evaluate the anticipated need and to select the appropriate product to meet that need and apply the device in an approved manner.

questions

FAQs

No items found.

Related Resources

Gowns
Instructions For Use
Read the resource

Overhead Thumbloop Gown (Open Back): Proper Donning & Doffing Instructions

Learn proper donning and doffing techniques for PRIMED overhead thumbloop open-back gowns.

Overhead Thumbloop Gown (Open Back): Proper Donning & Doffing Instructions
Gowns
Instructions For Use
Read the resource

Overhead Thumbloop Gown (Full-Back): Donning & Doffing Guide

Learn best practices for our overhead thumbloop full-back gowns. Find information on best practices for PRIMED’s medical & isolation gowns.

Overhead Thumbloop Gown (Full-Back): Donning & Doffing Guide
Gowns
Instructions For Use
Read the resource

Chemotherapy Drug Tested Gown: Best Practices

Explore best practices for PRIMED medical and isolation gowns, including guidance on proper use, storage, shelf-life, and safe donning and doffing procedures.

Chemotherapy Drug Tested Gown: Best Practices

need more
information?

Contact our team to ask any questions you might have, they would love to assist you!

REady to
order products?

Contact our sales team, they would love to assist you in ordering the products you want!

want to
try our products?

Use our online shop to order our most popular products.